

By Sarah Sarfaty, AEMT
With two weeks extra in Chile after instructing a Wilderness Life Support for Medical Professionals (WLS:MP) course in Cajon del Maipo, I decided to backpack the W-Trek in Torres del Paine National Park, Patagonia. The trip was Oct 3-7, 2023. This was my first solo backpacking trip and my first international backpacking trip.
The planning
When it comes to wilderness in the US, I’m fairly well versed. Chile was an entirely new project to tackle. The language barrier was a struggle and I relied heavily on website page translation.
I was lucky that the National Park was open to trekking during my window in Patagonia. With the seasons reversed, I was going to be there during mid-spring. Fortunately, this was early in the season. While I had additional weather complications, the lack of crowds made it worth it. If you’re going during the busy season, you’ll need to book all your travel and lodging well in advance.
My first step was to decide which direction to do the W-Trek. I chose west to east, although I ran into an equal amount of people going both directions.
My next step was to decide the number of days I wanted to spend backpacking. The average length is between 3-5 days. I chose the 5-day option to give myself plenty of time to enjoy the park. Those who I met doing a shorter time frame seemed to be in a much bigger hurry or didn’t complete all the portions.
The trek gets its name based on the ability to see the different views along the way. The three legs of the “W” are all viewpoints, not mandatory backpacking portions. Because of this, I had an out-and-back style on days 1 and 2, was able to day hike a portion of the trail on day 3, and had a day hike on day 5.
The Trek- Camping
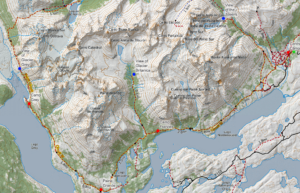
After I decided my length, I needed to book campsites at each refugio I’d be staying at. There’s a variety of options, which is both confusing and helpful. I ended up choosing the following:
| Day | Starting Point | Distance | View Point | Camping |
| 1 | Paine Grande | 7 miles | Glacier Gray | Gray Camp |
| 2 | Camp Gray | 7 miles | NA | Paine Grande |
| 3 | Paine Grande | 14 miles | Glacier Brittanica | Camp Frances |
| 4 | Camp Frances | 10 miles | NA | Central Camp |
| 5 | Central Camp | 10 miles | Mirador Torres | Exit- Bus Terminal at Central |
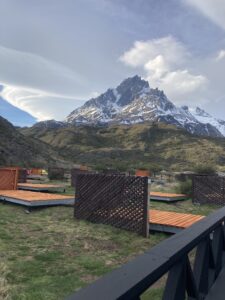
Within the national park are a series of Refugios- hotel/hut systems that have camping, lodging, food, and bathrooms. I needed to book all these in advance, so I spent a large amount of time looking over maps to see what was best. Know that these are often owned by independent companies, so you’ll need to piece together your travel plan. While the campsite reservations were reasonably priced, I was surprised at how expensive it was to stay in the buildings. As such, I camped for the entire trip.
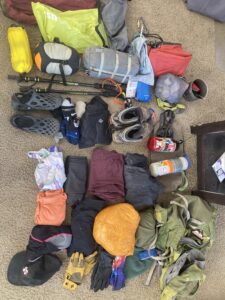
The Trek- Gear
Food
Along with camping for the trip, I also decided to bring all my food. A couple of notes on this:
- You cannot fly with fuel canisters. That being said, there are tons of gear stores selling propane and white gas in Puerto Natales
- Food in Puerto Natales is expensive. While there are grocery stores to buy on the cheaper side, prices will be comparable to the US. I brought some food down from the US with me (mac and cheese is my go-to backpacking food) and bought the rest down in Puerto Natales.
- While you can advance order meals at the Refugios, they also have food for purchase. If you run short or want a hot meal you didn’t cook yourself, you can always use this option!
Before you judge my menu (listed below) know that I prioritize ease of cooking, calories per bite, and simplicity. If you aren’t able to eat the same thing several days in a row or need something more gourmet, I applaud you. I was able to add a large amount of calories with butter in every cooked meal, an advantage of cold-weather backpacking. It also helps the taste!
My menu:
| Breakfast | Lunch | Dinner | Snacks |
|
|
|
|
Equipment
Packing for this trip was a special challenge, as I had to separately pack for the rest of my trip. This was the first time I prioritized ultra-lite gear, which overall was very successful. However, my tent pole did get bent in the wind and my sleeping bag left me a little cold each night. I didn’t need to worry about bathroom equipment or water purification, a luxury compared to my desert experiences. I did have to worry about the wet through, something I’m less used to.
My sleep set up
Kitchen
Misc
|
Layers
|
All this fit in my 60+10L backpacking pack. I’ve been using this pack for about a decade; it’s well-loved but fits me properly. I didn’t bring a smaller pack for my day hikes, electing to use my raincoat pockets.
I also want to put in a plug for trekking poles! These are amazing and massively improved my experience. My knees didn’t complain once, a miracle.
Travel
Flights
First and foremost, it’s important to know how to get down to Chilean Patagonia. Per my local contacts, I decided to fly from Santiago down to Punta Arenas. LATAM Airways is a popular airline for in-country travel and served me well. Be warned that it is an airline that measures the size of your carry-on- I decided to check my backpacking pack to avoid any last-minute difficulties.
Buses
From Punta Arenas, my next step was to head north to Puerto Natales. This small tourist town is the starting point for lots of Patagonian travel. There is an abundance of hostels, outdoor gear shops, and restaurants catering to English-speaking travelers. While buses are frequent and easy to book, it’s important to know that there is no sign showing where the bus will pick you up at the airport. Additionally, be prepared for them to be late. If you hang out outside the departure drop-off, you are in the right place.
Once you are in Puerto Natales, you next need a bus to Torres del Paine National Park. The same bus line will take you there, and you’ll use the same bus terminal.
Once you arrive at the National Park entrance, you’ll need to get off the bus to check in and prove the purchase of your park pass. From there, you’ll need to get back onto the correct bus, as they go to the two opposite sides of the park.
Ferries
The final mode of transport for this trip (outside of walking) was a ferry to the starting point. The bus takes you straight there, and then it’s a short ferry ride across Lago Gray to Paine Grande. You can take the ferry back if you choose to hike in the opposite direction, just make sure you set up the bus properly on the other side. You cannot purchase ferry tickets online in advance so make sure you bring cash.
Santiago –> Punta Arenas via flight
Punta Arenas –> Puerto Natales via bus
Puerto Natales –> Torres del Paine National Park Entrance via bus
Torres del Paine National Park Entrance –> Ferry Terminal via bus
Ferry Terminal –> Paine Grande via ferry
The Experience
The Fun
Being solo
Most of my backpacking experiences have been work related, and never solo. But after this trip, I see why people go backpacking for fun. Getting to set my schedule, my pace, and having only myself to worry about was a highlight for sure.
The other people
I know this is a direct contradiction to what I just said, but it was so fun to see other people hiking the W. I’d run into the same people each evening, where we would swap stories, share tips, and struggle together.
The views
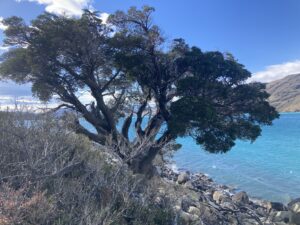
Patagonia is world famous for a reason. The mountains, glaciers, and lakes were all spectacular, with a new view over each ridge.
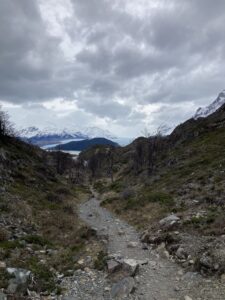
Left: Day 1, Lago Grey
Right: Day 2, Camp Paine Grande
Day 4, Lago Nordenskjold
The Hard
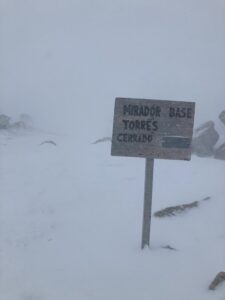
The weather
While the above photos were taken while the sun was shining, the weather was not so favorable the entire trip. Day 3 and day 5 were rainy and, at elevation, snowy. The wind was so strong it bent my tent pole, reaching upwards of 80km an hour. At the end of the last day, I had a very wet bus ride back to Puerto Natales.
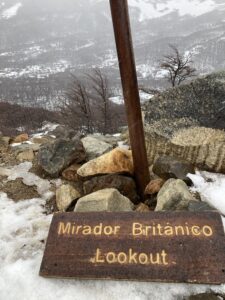
Day 3, the lookout for Glacier Britanico
Day 5, the viewpoint for the Towers (do a quick google search for the actual view!)
I ended up post-holing in snow, using my micro spikes, and being very grateful for my gear.
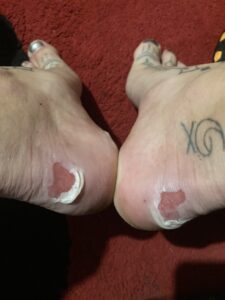
Blisters
This comes to a surprise to no one, but I managed to get massive blisters on day 2 of the trek. I felt the hot spots and ignored them, thinking I was close to my destination for the day. This led me to taping my feet and managing the pain for the rest of my trip.
The Takeaways
Trips like these don’t happen often, and the biggest takeaway I had from the experience was gratitude. Gratitude for natural spaces, helpful strangers, and my own competency. I didn’t meet anyone else who was both carrying their own food and camping. I totaled about 60 miles traveled and 8000 ft of elevation gain. I finished all portions of the trek, even if I wasn’t always rewarded with a view. Type II fun has different rewards, and I have a special love of doing hard things.
My hope is to go back one day to do the full O-trek, the circumnavigation of the mountains seen on the W. I also want to see the views I missed, spot a cougar, and improve my Spanish skills. The areas surrounding Torres del Paine also deserve a visit, and I’d love to go to the bottom of the world for longer next time!

Day 1, after seeing Glacier Grey for the first time